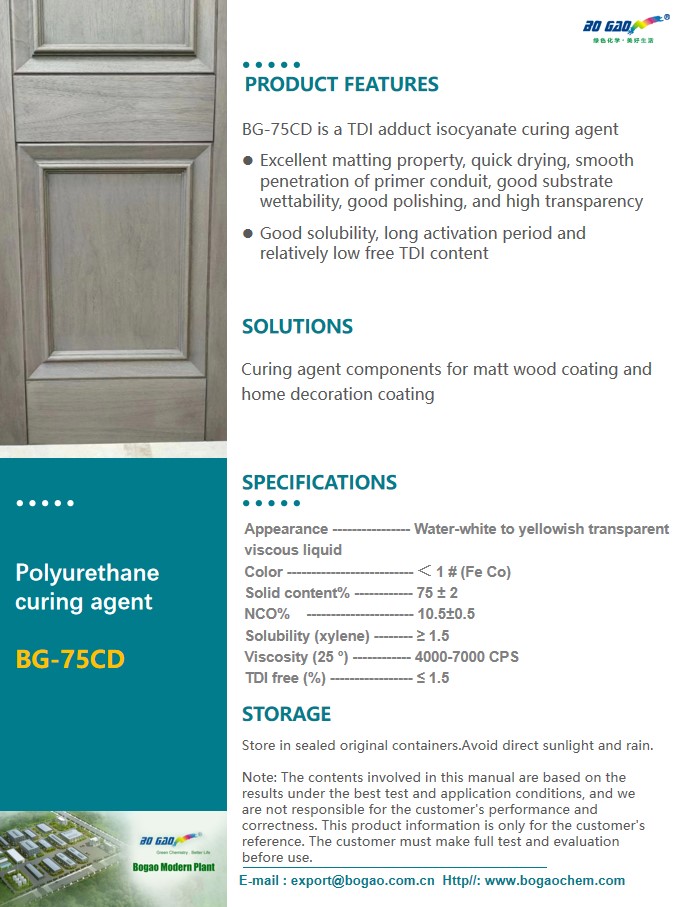
Discover the Savory Flavor of Air Dried Beef Snacks, Rooted in South African Tradition

By:Admin on 2023-06-22 03:41:59

Biltong: The Air-Dried Beef Snack That's Taking the World By StormIf you're looking for a delicious and healthy snack that's perfect for those on the go, look no further than biltong.Biltong is a traditional South African snack that is made from tender cuts of grass-fed beef, salt, and a blend of spices. It is then air-dried for several days until it becomes a perfectly seasoned and chewy treat that's packed with protein and flavor.One of the best things about biltong is its versatility. It can be eaten on its own as a snack, used as a topping for salads or pizzas, or added to sandwiches for an extra boost of flavor. It's also an excellent alternative to traditional jerky, which is often loaded with preservatives and artificial flavors.At (removed brand name), we take pride in our traditional biltong recipe, which pays tribute to the seasonings and methods South Africans have been using for centuries. We start with the soft cuts of premium beef and add our signature blend of spices, including coriander, salt, and black pepper. We then air-dry the biltong for several days to create a texture that's perfectly chewy and bursting with flavor.One of the key ingredients in our biltong recipe is our air-dried coating curing agent. This innovative ingredient allows us to create biltong that's perfectly seasoned and incredibly tender. It also ensures that our biltong is free from any harmful additives or preservatives.Whether you're a seasoned biltong lover or new to this delicious snack, (removed brand name) has you covered. Our traditional flavor is simple and distinct, allowing the soft cuts of premium beef to shine through. We also offer a variety of other flavors, including spicy peri-peri and smoky BBQ.In addition to being delicious, biltong is also incredibly good for you. It's packed with protein, which is essential for building and repairing muscles. It's also low in carbohydrates and is a great source of natural energy.In conclusion, if you're looking for a snack that's both healthy and delicious, give biltong a try. With its chewy texture, excellent flavor, and all-natural ingredients, it's no wonder why biltong is quickly becoming one of the most popular snacks in the world. So why wait? Try (removed brand name) biltong today and see for yourself why this South African snack is taking the world by storm!

Read More

Crystal Clear Anti-UV Epoxy Resin and Hardener Kit for DIY Art Craft and Table Top Coating, Non-Toxic and Easy to Pour, Perfect for Jewelry Tumbler Wood - 16OZ Size for Beginners and Professionals

By:Admin on 2023-06-19 05:05:56

Epoxy resin, also known as polyepoxide, is a type of synthetic polymer that forms when you combine epoxide with hardening agents. Epoxy resin has a wide range of applications, including use in industrial coatings, as adhesives, and for the creation of jewelry pieces, wood coatings, and other DIY projects.One of the best things about using epoxy resin for DIY projects is that it is versatile and easy to use. Whether you are a beginner looking for a starter kit or a professional looking to create intricate designs, there are plenty of options available on the market.One such product that is gaining in popularity is the Anti UV Epoxy Resin and Hardener Kit Crystal Clear Easy Cast for DIY Art Craft Resin & Table Top Coating Epoxy, Non Toxic Resin Pour Accessories for Jewelry Tumbler Wood, 16OZ for Starter&Professional. This kit contains everything you need to create beautiful jewelry and wood coatings, including a crystal clear hardener and resin, mixing cups, stir sticks, and gloves.One of the standout features of this kit is its anti-UV capability. UV rays from the sun can cause epoxy resin coatings to yellow and crack over time. However, this product's anti-UV properties help protect against yellowing, ensuring that your DIY project retains its clarity and beauty over time.Another important feature of the Anti UV Epoxy Resin and Hardener Kit is its non-toxic nature. The resin is free of toxic fumes and does not emit harmful odors. This makes it safe to use indoors, even in small spaces, without needing to wear a respirator or protective gear.The kit is suitable for use on a wide variety of surfaces, including wood, metal, glass, and ceramic. It is also ideal for coating jewelry, tumbler cups, and other DIY crafts. The product's user-friendly formula ensures that it is easy to use, even for beginners.The kit includes clear instructions to help you achieve the desired results. The product is designed to provide a high-gloss finish that is water-resistant and durable, making it perfect for use on items that will be subjected to wear and tear.In conclusion, the Anti UV Epoxy Resin and Hardener Kit Crystal Clear Easy Cast is an excellent option for anyone looking to embark on a DIY project. Its anti-UV capabilities, non-toxic nature, and user-friendly formula make it an excellent choice for those looking to create beautiful wood coatings, jewelry, and other DIY crafts. If you are looking to achieve a professional-grade finish at home, the Anti UV Epoxy Resin and Hardener Kit is definitely worth considering, especially if you're interested in adding a DIY WOOD COATING Hardener to your project.

Read More

Ultimate Guide: Mastering the Art of Resin and Acrylic Pour for Stunning Countertops

By:Admin on 2023-06-15 03:58:34

Countertops, Acrylic Pour, and Resin FinishAcrylic resin countertops are popular among homeowners and interior designers because they are durable, affordable, and offer countless design possibilities. One of the most exciting trends in home decor right now is the resin and acrylic pour finish that gives countertops, tables, and other surfaces a unique, high-gloss finish.If you're curious about how to create your own resin and acrylic pour finish on your acrylic resin countertops, keep reading! In this blog, we'll walk you through the steps to achieve an eye-catching finish that will elevate your home decor to the next level.What You'll NeedBefore we get started, here's a list of the materials you'll need to complete a resin and acrylic pour finish on your acrylic resin countertops:- Acrylic resin countertops (make sure they are clean and dry)- Pouring resin- Acrylic paint (choose your desired colors)- Plastic cups- Plastic stirring sticks- Drop cloth or protective covering for the floor- Heat gun or propane torch (for removing air bubbles)- Sandpaper (for smoothing out rough spots)Step 1: Prepare Your SpaceTo start, it's essential to create a clean and safe space for your resin and acrylic pour. Cover the floors and any surrounding surfaces with a protective drop cloth or covering to prevent spills. Make sure to have good ventilation as the fumes can be toxic, so avoid working in a confined space.Step 2: Mix the ResinPour the recommended amounts of resin and hardener into separate plastic cups, each should have measurements included in their packaging. Mix them together thoroughly, making sure to scrape the bottom and sides of the cup,Step 3: Add Acrylic PaintOnce you have mixed your pour resin components together, you can add in your desired acrylic paint colors. Be careful not to add too much as the opacity will alter the color hue. Mix thoroughly, until a homogenous mixture is achievedStep 4: Start PouringPour the resin mixture onto the countertop, spreading it evenly to cover the entire surface. You can use a plastic stirring stick to distribute the resin if needed, being sure not to overwork or scrape the surface.Step 5: Create a DesignThis step is where you can let your creativity shine. Create your desired design by pouring different colors of resin mixture in different areas of the countertop. Spread the mixture evenly by tipping or rotating the surface of the countertop till it's completely covered. You can even add texture by lightly tapping the surface with your stirring stick. Once you are happy with the design, set it aside to cure.Step 6: Remove Air BubblesAfter the pouring is complete, take a propane torch or heat gun to remove any air bubbles that may have formed in the mixture. This is an important step as any trapped air bubbles can lead to weak areas in the final finish.Step 7: Finishing TouchesOnce the resin has cured and hardened, use sandpaper to smooth out any rough spots or bumps in the surface. Take care not to take too much off, and if it is not your first time doing this, start with a higher grit before going progressively lower. Finally, give it a good polish using a polishing compound. And there you have it, a beautiful high gloss, unique finish, compliments of you.ConclusionAcrylic resin countertops are a great option for homeowners on a budget who still want a high-end look in their kitchen or household environment. By using a resin and acrylic pour finish, you can add a touch of luxury and creativity to your countertop and bring your design vision to life. Using these tips, you can have a perfectly polished acrylic resin countertop in no time, and add a striking feature to your home.

Read More